Jim

May 082018
 

It’s been awhile.

Don’t look at me like that… It’s not like I’ve been out there winning beer competitions and brewing barrel after barrel of delicious homebrew while deliberately leaving you out of the loop.

Nah, man, it’s more like I lost my mojo. I gave up. I had a few false starts and would make some beer, but my heart wasn’t really in it and it didn’t take much to get me to cancel a brewday.

I have a refrigerator full of old yeast, a freezer full of hops pellets, and some old recipe kits I haven’t done anything with. My equipment sits unused and dusty. All remnants of what used to be a very fun hobby.

But, wait! For the first time in a long time, I actually want to brew again! I have ingredients on order for a batch this weekend and a bunch of new equipment I’m dying to break in.

The Hammer bought me some awesome stainless steel gear last year. The first item is the SS Brewtech Brew Bucket fermentor (Brewmaster Edition). I’m really stoked about this little guy — it replaces the lousy plastic buckets I’ve been using forever, the ones with the lids that have nooks and crannies you can never get the dried krausen out of. The ones I have to keep replacing over and over again. Finally, I have a real fermentor — easy to clean, easy to sanitize, racking arm, conical bottom for trub/yeast collection, and a thermowell I can use with my temperature controller’s probe to get better fermentation control.

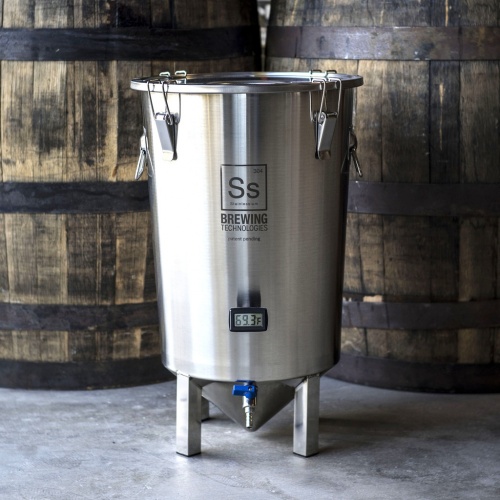
It’s just small enough to fit into my fermentation fridge, so I don’t need to change anything as far as that goes. Really looking forward to using this for the first time!

The second awesome gift was a SS Brewtech 10G InfusSion mashtun. Again, this is replacing old plastic — however, this time, it’s bittersweet, because it’s my old friend Mr. Mashtun who is being put out to pasture.
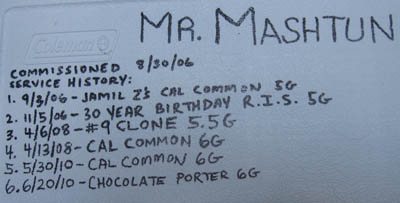
Mr. Mashtun

Mr. Mashtun

That’s right, Mr. Mashtun, made with my own two hands, along with two additional hands of my dad, commissioned way the f back in 2006, is retiring. I will never forget his service and his contribution to my progression into all grain brewing. However, when I look at what the future holds I can’t deny that we are making some serious progress here…

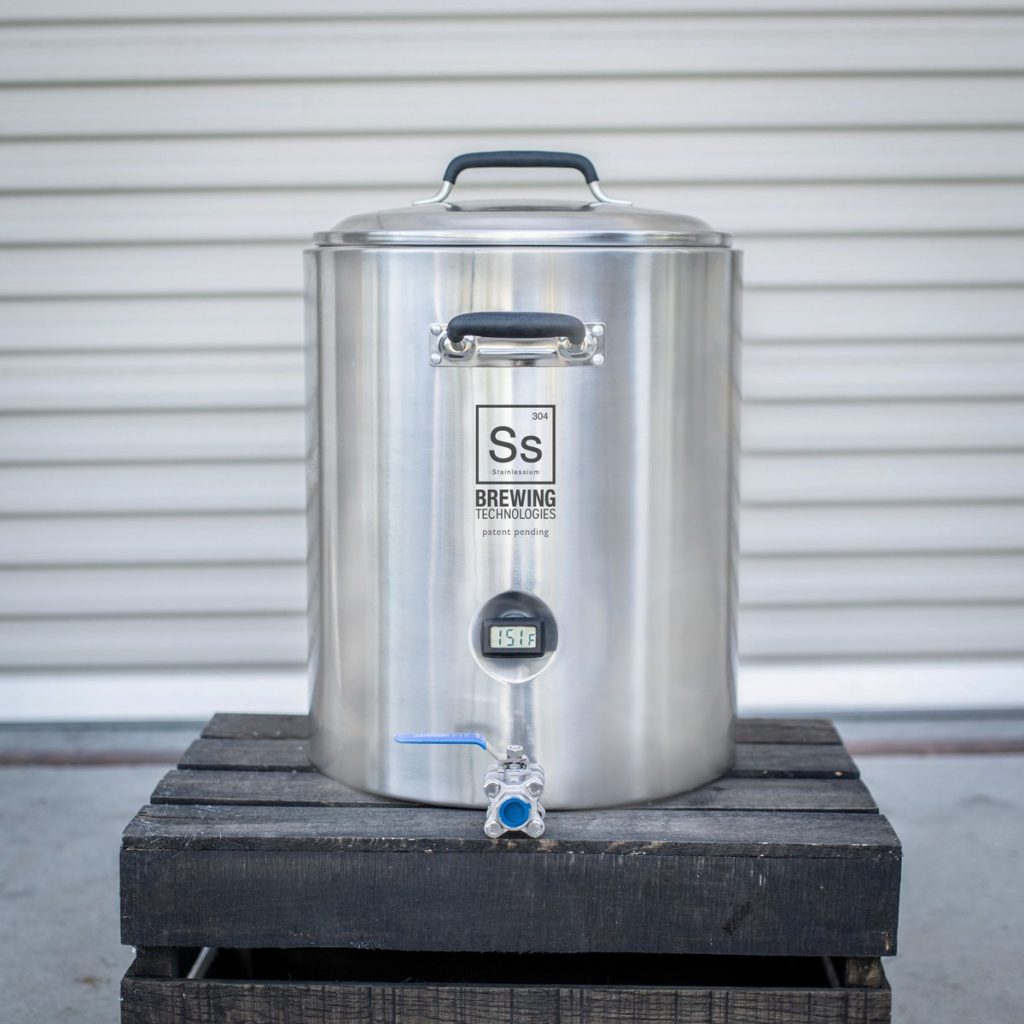
I’m really excited to see what impact this new mashtun has on my efficiency numbers…I’ll still be batch sparging for the time being, but this might even get me experimenting with fly sparging. SS Brewtech makes a pretty nice add-on sparge arm, but I’m going to wait until I have a few brews under my belt first.

I’ll be brewing up an old favorite, the Engine 97 Steam Beer I adapted from Jamil Zainasheff’s famous California Common recipe. Wish me luck, and hopefully I’ll be seeing you around here a little more often.

Sep 142016
 

My friends, I have strayed…

Over the last few years, my brewing became more and more sporadic, evidenced by the lack of posts on this site. Increased work responsibilities and other interests were competing for my time and energy and brewing became… a chore. I made a handful of batches to try and stay current, but the brewery gradually fell into disarray. My brewday documentation became non-existent. I stopped reading (and writing) beer articles. The beer, while still drinkable, suffered greatly. I had fallen from grace.

But O! I am nothing if not resilient! The fire was rekindled this weekend when I was convinced by The Hammer to enter my first homebrew competition. The only beer I had available was a Heady Topper clone I brewed a few weeks ago. Everything that could’ve gone wrong with this beer did. First I unknowingly bought an extract kit instead of all grain — oh well, roll with it, it’ll cut a couple hours off the brewday, right? Boil and hops additions went well, until I realized I forgot to use my hop spider — a huge mistake when using a plate chiller. When it came time to chill the beer, my chiller got clogged and I was dead in the water (worter?).

Five gallon Torpedo kegI wound up throwing the wort in the fermentor and leaving it in my basement overnight to cool. Pitched the yeast the following day, then ignored the beer for a month. Did not dry hop it, did not take gravity readings, I couldn’t care less about this brew. Until this competition deadline was looming.

Somewhere on Sunday, as I cleaned my kegs and racked the beer and fought a CO2 leak… as I gazed over the dust-covered, neglected collection of my brewing equipment, I got mad. I was pissed that I had let things go like this. Pissed that I let the world take the fun out of brewing. Pissed as I watched the beer world explode around me, breweries opening every day, homebrewing equipment and ingredients and techniques reaching never before seen heights…pissed at myself that I wasn’t a part of it all.

The next day I went online and ordered the ingredients needed to brew one of my favorite old recipes, Engine 57 Steam Beer. They arrived today, along with a gleaming new keg (pictured above). I’ll be brewing that beer this weekend. Next up is my IPA recipe. Then on to some other styles. I’m not stopping until I have all five of my kegs full of beer. I’m entering these beers into competitions, and I’m going to win medals. I’m getting my brewing mojo back, dammit!!

That Heady clone? Not ready to be competitive yet, and it might never be. It has a harsh hop bitterness in the finish that might mellow with time in cold storage, or might be a result of staying on the trub too long and never fade. Don’t get me wrong, it’s tasty, but I don’t expect a high score from it. It doesn’t matter, though — I entered it anyway. It was more of a symbolic act — atoning for my sins, getting back in the scene, and making some amazing beer.

Apr 092013
 

The date for the annual Independence Day Gala has now been set as July 6th, which means I have 88 days to plan and brew my beer selection for the party. It also sounds like we’ve been authorized for another chest freezer to use as a food overflow fridge/fermentation chamber (have to double check that one with The Hammer, I might have dreamed it). This all adds up to some lofty plans for some lager brewing.

I’ve never brewed a lager, but it’s been on my list for quite some time, and with almost three months of lead time I should be able to get one, maybe two brewed up in time for the party (assuming about 1.5 weeks fermentation and 6-8 weeks lagering). So what to make?

Sage advice...

Sage advice…

In my last post I talked about wanting to brew a Schwarzbier, so that seems a good place to start. I love the idea of having this beer at the party, as it pleasantly surprises a lot of people who think dark beer is heavy beer. The Schwarzbier is dark as night in appearance but drinks nice and mild. There’s not a lot of hop bitterness (think typical German lager balance) and it uses dehusked Carafa which adds the dark black color without the roastiness and astringency associated with stouts. I’m looking at a grainbill of 50% Munich, 40% Pilsner, and some specialty grains to add color and a touch of depth to make up the other 10%.

If I do find time to get a second lager going, I think I’d like to try a Vienna Lager. This is one of my favorite commercial styles (Negra Modelo is a good example) and I like the story of how the style showed up in Mexico when Austrian brewers emigrated there in the late 19th century. It’s a nice, smooth beer that also works well in hot weather. I’ve seen some variations like smoked Vienna Lager, so maybe there’s some room to play around there as well.

Hopefully I’ll be able to get one of these started this weekend and have enough time to make two lagers and one or two ales (a lighter wheat beer and an IPA are on the short list).


Feb 202013
 

Wow, been a little while, huh?

Well, I haven’t been brewing a whole lot lately and I’ve been jonesing for that sweet smell of wort. In a few weeks it will be warm enough to start churning out some beer, so I’ve been thinking about a few new styles I’d like to try.

One that’s been on my list for awhile is a Schwarzbier, similar to this tasty Kostritzer:

Kostritzer Schwarzbier

This is one of my favorite styles – dark as a stout but with the light crispness of a lager. Beautiful beer! This will also mean I get to cross brewing a lager off of my Fermentor List (brewer’s bucket list, har har). I’m currently researching some recipes and will report back when I’ve found a suitable one.

Also, and this is LONG overdue – if you recall, way back in 2011 I announced a re-branding of this site. Lootcorp is a domain name which I hold near and dear to my heart, but it has nothing to do with beer or brewing and doesn’t really work for a beer site. The new site will be called BrewBrewDrink.com and it should be live by Spring. Stay tuned!

Aug 182011
 

Assistant Brewmaster Bella

My trusty assistant

It was a brewing emergency – we had a scant two weeks before some beer-loving guests arrived to spend the weekend at the compound, and our kegs were running critically low! I checked the weather forecast and saw a week of rain – except for Wednesday. Wednesday was forecast to have cloudless skies and plenty of sunshine, an outlier in an otherwise crappy week. I quickly arranged to take the day off of work, grabbed the Assistant Brewmaster Bella, and set out to brew up some witbier.

I’m a big fan of witbiers – they are nice and refreshing on a hot day and are also great bridge beers you can use to expose your macroswill-chugging friends to craft beer without scaring them off. There’s a delicate balance that makes this a challenging brew to pull off correctly. The beer is supposed to have a touch of sweetness (usually present as honey or vanilla notes), moderate citrus fruitiness, some spicy, peppery notes, and a very slight lactic bite in the finish. If any one of these flavors becomes too dominant, the beer will lose the refreshing crispness that wits are known for. Witbiers should also have a somewhat creamy, smooth mouthfeel from the use of wheat and oats in the mash.

Mashing in the kettle

Mashing in the kettle


The recipe I used called for:

  • 5.5# of Pils malt
  • 5# flaked wheat
  • 2# flaked oats
  • 0.25# Munich malt
  • 1.2oz Hallertau hops @ 60 min
  • 43g citrus zest
  • 11g cracked coriander seeds
  • 1g dried chamomile flowers

You don’t need to grind flaked wheat and oats, but I threw them in the mill because I’ve heard of slight increases in efficiency when doing so. I mashed in my kettle, since this was a step mash and it’s much easier to do those with direct heat. I used a protein rest at around 124°F for 20 min or so and then brought the temp up to 158°F. The problem with mashing in my kettle is that it loses heat very quickly. I had to fire the burner several times over the mash to keep the temp up, and in reality it fluctuated anywhere between 160°F and 153°F. It spent the bulk of the time in the 156-159°F range, so hopefully there will be no ill effects on the finished product.

I tried a new technique this time – iodine testing for starch conversion. Basically, you buy a bottle of tincture of iodine (available at any pharmacy) and use it to test your mash. Extract a small sample of mash liquid (there should be no grain particles in the sample) in a bowl or something and add a drop of iodine – if it turns black, conversion is not complete. If it stays tan/reddish, you are good to go. My recipe called for a 90 minute mash due to all of the wheat and oats, but testing at 60 minutes showed conversion was done so I mashed out at 168°F. I then added about a half pound of rice hulls to help avoid a stuck sparge.

Hops and zest

Hallertau hops and citrus zest

I nailed my pre-boil target exactly – 7G of wort @ 1.042 SG. The rest of the brew went very well, except for one mistake – I miscalculated my evaporation rate. I had been doing 60 minute boils and forgot to compensate for the fact that I was using a 90 minute boil for this recipe. Stupid mistake, and I paid the price. What should have been 5.5G of 1.050 SG wort turned out to be ~4.75G of 1.069 SG wort!!

Well…I made two mistakes here. First was not compensating properly for the longer boil. Second was not testing the gravity during the boil. If I had been keeping an eye on things, I could have added water or reduced the boil time to compensate. However, if I’m going to miss on gravity, I always prefer missing to the upside. When my beers miss high, I just throw the “imperial” tag on them and call it a day!

Highlight of the brewday had to be the last five minutes of the boil, when I added in the citrus zest, the chamomile, and the coriander – the wort smelled amazing! I didn’ have time to make a yeast starter for this brew, so I pitched two packs of Wyeast 3944 (Belgian Witbier). Not very cost effective, but the right thing to do in the absence of a proper starter.

All in all, it was a good day and a good brew – I just hope the higher alcohol content doesn’t wreck the balance of the beer. I’ll keep you posted!

Aug 182011
 

So, last time I posted here (ahem…cough…almosttwomonthsago!… cough cough) I spoke of rushing a beer and going from grain to glass in one week. Well, the experiment was a smashing success! I decided to go with a nice American wheat flavored with some boysenberry extract.

The beer was definitely green, but it was surprisingly drinkable. I told everyone at the Fourth of July gala that it was an experimental brew, so I figured people would stay away from it. Boy, was I wrong! I heard from several people that this beer was their favorite of the three (the others being an IPA and a Kölsch), and it was the clear favorite of the ladies. So, brewers, never again let your procrastination and poor time-management skills stop you from your mission!

In other news, I have finally decided to change the name of this blog to something more beer specific. Coming this fall, I will be re-launching the site at BrewBrewDrink.com. This dovetails nicely with some other beer-related programming projects/websites I am working on, and I’ll have more news on those as they develop over the coming months.

Finally, I wanted to give a shout out to another Connecticut brewer I had the pleasure of meeting recently. My friend Jeff and I were able to spend a great Saturday assisting Brewmaster Dan of Two Beagles Brewing with a batch of American Pale Ale. Dan is an extremely knowledgeable brewer and a great host, and I was able to see the Sabco Brew-Magic in action. I’ve been considering upgrading to a system like this for awhile, and this brought me one step closer to pulling the trigger. It was great to watch another brewer in action, and I was able to pick up a lot of tips and tricks I’ll be applying to my own process. Many thanks to Dan for his hospitality, and the great Vienna Lager and Maibock he allowed us to taste!

Jun 212011
 

Alarm clockAfter several very busy weekends, I find myself a couple of kegs short of my July 4th weekend party goal. The party was supposed to feature four styles of beer, which I knew was an ambitious plan. I should be happy I have two styles ready to go – the American IPA I brewed in late May, and a batch of Kölsch brewed a couple of weekends ago which is ready to be kegged.

Most brewers would hang up their mash paddle and enjoy the party, happy to be able to serve 10 gallons of good brew instead of the usual backyard BBQ crappy macroswill. Especially considering that there is still a plethora of party details to take care of in the next week and a half, including a fairly involved food menu. However, I am not like most brewers – I am completely insane. I’m considering trying to go from grain to glass in one week.

Many a brewer has tried to rush a beer along to try and meet some competition or party deadline. Most of the time, the results are disastrous. The dance of yeast and malt is a fickle one, and trying to force the beer to bend to your schedule can lead to a host of issues. Hot fusel alcohol notes from high-temp turbo fermentations, CO2 bite from rushing a forced carbonation (natural carbonation isn’t even an option on this schedule!), and overall green-tasting beer are just a few of the perils that await an impatient brewer.

I do, however, think it can be done. Let’s talk about some assumptions.

Assumption 1: You aren’t doing this with any kind of complex beer. Forget anything with an OG above 1.040 or so. Forget your dry-hopping, your nine-malt grain bills, your oak chips, your bourbon infusions, all of that. We have to go fast here, and any kind of complexity is going to need time to mellow and allow flavors to meld.

Chris Hansen

"Put down that Hefe and have a seat over here"

Assumption 2: Forget any kind of aging/conditioning process. If we had time to lager this beer, we wouldn’t be in this situation. So we need ales that are best enjoyed young. I mean really young. I mean, if these beers were people, you’d have Chris Hansen getting all To Catch a Predator on your ass. A few styles instantly come to mind – witbiers, hefeweizens, English milds, American wheats – all best served at the peak of freshness.

Assumption 3: We need a fast and furious fermentation, but without sacrificing the beer quality by going too hot. Hefeweizen yeast can ferment at higher temps, but I still try and keep things on the cool side to keep the banana esters from becoming too overpowering. Saison is another style that can be fermented on the warm side, but I think it might have too complex a flavor profile to meet our first assumption. So, if we can’t ferment hot, how else can we speed up the process?

Assumption 3a: We are going to need a lot of yeast. This means either using a yeast cake or making a very large starter. You want the yeast to hit the ground running and not waste a single precious moment.

Assumption 3b: We want to use wheat, which is known for extremely active and fast fermentations. Wheat beers offer another advantage as well – they are usually meant to be served with yeast in suspension, meaning we don’t have to worry about filtering or wasting precious time trying to get the beer to drop clear.

OK – so now that we have some ground rules, it’s time to figure out exactly what to brew. This beer will be served next to an IPA and a Kölsch, so I want its flavor profile to be somewhere in the middle. I’m going to use the yeast cake from the Kölsch, so a true hefe is out. That leaves me with a witbier, with its coriander and citrus tang, or an American wheat, which I would probably add some sort of fruit extract to. I plan on fermentation being done by day three or four, leaving me some time to get the beer kegged and carbed in time for the party.

I’ll be making my final decision over the next couple of days, and plan to brew this puppy in a late-night session after work on Friday. I’ll keep you posted.

Jun 082011
 

Old beer cansI opened up the chest freezer I use as a serving fridge, not really knowing what to expect. It had been almost a year since I had poured any homebrew, and I figured the inside of the freezer would be a mess, full of nasty, empty kegs and some kind of mold/slime combination. I wasn’t looking forward to the cleaning job that surely awaited me.

Imagine my surprise when I discovered a nice, clean interior stocked with three almost-full kegs of beer, and a bottle of champagne to boot! The freezer had been held at a steady 40°F the entire time, and the kegs were all pressurized. Only one question remained – was the beer still drinkable??

It looked like I had about 7 or 8 gallons of a pumpkin spice I had brewed (which had turned out a bit more “imperial” than I had intended) and around 4 gallons of the Kölsch I brewed last August. I poured a few pints, called the wife over, and proceeded to hope for the best…

…and it was good!! All the beer was excellent! The carbonation levels could use some adjustment, but the pumpkin spice ale had mellowed nicely, and the Kölsch didn’t have any off-flavors to speak of! This was great news, since I worry so much about sanitation and the longevity of my beers. I’d love to brew up some special Belgians or barleywines and cellar them for a few years, and this gives me a boost of confidence that my procedures are pretty sound and I might be able to pull that off.

Now, I’m left with a problem I don’t mind having – how to dispose of many gallons of tasty homebrew to make room for many more gallons of tasty homebrew?

Sounds like a party to me!

May 272011
 

Sometimes you just nail it.

Last weekend’s IPA brewday was one of my best ones yet. All of the water volume data I recorded last year finally paid off big time – my original gravity came in at 1.072 vs an expected 1.071 – my most accurate brew to date! It wasn’t perfect – my mash efficiency came in 5% low (75% vs the expected 80%), and I was still about a half gallon of wort short at the end (5.5 gallons into the fermentor instead of 6) – but the errors were small and effectively cancelled themselves out. Sometimes the brewing gods smile upon you and two wrongs do make a right!

Fresh hops

All of the data I took last year was very helpful in estimating my grain absorption and evaporation rates and tun, kettle and cooling losses. My new water meter made measuring water a snap, and I decided to round all measurements to the quarter gallon. This took a lot of the micro-management out of the water side of things, and I’m very pleased with the results. This was my goal all along – the meticulous collection of data leading to the ability to relax and enjoy the results.

The IPA has been gurgling happily in my fermentation fridge at around 65°F – my basement is actually cooler than that, so I’m using this brewing space heater with a dual stage controller. It’s actually a flat pad you can stick to the wall of the fridge – perfect for maintaining ale temps in a cool basement or during the winter.

Today was the first gravity reading and taste test. The gravity is currently at 1.020 vs an expected final of 1.017, so it has a few more days before I crash cool it. The taste – all I can say is WOW! This is one nice IPA, even when it’s warm and flat! It has a really fragrant hop nose and you think it’s going to clobber you, but with its high starting gravity it comes out very well-balanced. Not too thick of a mouthfeel, a nice, strong malt backbone, and sharp, citrusy hop flavor cutting through it all. Even my wife loved it, and she is not a hophead at all.

You can find the recipe here. Also, I’m looking for a name for this beer – any ideas? Leave a comment or hit me up on Twitter.

May 232011
 

The biggest problem I’ve had to date with my brew system is water management. When you do partial boils, this problem never rears its head – you brew a few gallons of wort and just top off with water to get to your final volume. Easy peasy. When you start doing all grain mashes and full boils, however, you need to back into the amount of water to use, taking all sorts of factors into consideration. What is your evaporation rate during the boil? How much water does your grain absorb? What about cooling losses, liquid left in tubes, and deadspaces in kettles and tuns? It’s enough to drive a man mad.

Last year I focused on trying to pin down my exact water usage. First I tried using dipsticks. Then I tried weighing the water. I used various pitchers and containers to measure but the end result was always the same – small inaccuracies in my measurement methods would add up and I would end up missing my targets completely. The only thing consistent about my brewing setup was its inconsistency.

However, all of this data I gathered did help me find a pretty narrow range for things like grain absorption and evaporation rates. I was getting very close to the answer – now I just needed an accurate way of measuring the water.
 

Neptune T-10 water meter

Neptune T-10 water meter

Meet the Neptune T-10 residential water meter. The T-10 is supposedly optimized for accuracy during low-flow situations, which made it a perfect choice for my brewing applications. I picked this bad boy up from eBay last year, and finally got a chance to hook it up and give it a whirl. The goal was to find a way to hook up the T-10 to my hose spigot in the backyard. If this worked, I would have a way to measure the water I was adding to the system without having to use pitchers, scales, or (insert other time-consuming and frustrating methods here).

I ran off to a large, orange hardware store to look for the fittings I needed. It took two plumbing guys and about 30 minutes to find something that would fit the T-10 – the first few adapters they picked out didn’t seem to thread properly. I finally walked out with two 1″ ball valves, two 1″ to 3/4″ bushings (luckily, I noticed they picked out black pipe and swapped them out for galvanized – black pipe shouldn’t be used for drinking water applications), two garden hose adapters, and a white camper hose rated for potable water.

Fittings for the T-10 water meter

Fittings for the T-10 water meter

I applied a generous wrapping of teflon tape, screwed everything together, and hooked it up to the spigot. Much to my surprise, this Frankenmeter actually worked! I was able to measure out my strike and sparge water in a fraction of the time it used to take me, and some quick tests with a half gallon pitcher showed the accuracy was good enough for my purposes. The only complaint I have is that the odometer-style gauge on the front (which measures 10s of gallons) obscures part of the clock-style gauge that runs around the face of the meter (which measures fractional gallons, and is what I use). A Sharpie and ruler should remedy this easily enough, but it would be nice if I didn’t have to do that.

All hail mighty Neptune!

All hail mighty Neptune!

I view this experiment as a success – not only will the Neptune help me achieve greater accuracy in my measurements, but it is also going to save me a significant amount of time each brewday. It wasn’t cheap ($40 for the meter and $40 for the fittings, although I really only needed one ball valve) but the benefits definitely outweigh the costs.