Jun 102008
 

Click here for this brew session’s recipe…

Sunday, the first of June, was a beautiful and sunny day in Fairfield County – perfect for brewing. I had been planning to make a batch of a Leinenkugle’s Sunset Wheat clone for some time, so I seized the opportunity and fired up the ol’ burners. Since this is the first brew session I am posting, I’ll go into more detail about my process than I would otherwise. If you have any questions, leave a comment and I’ll be happy to answer them!

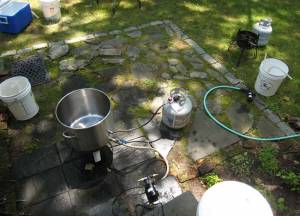
Brewday equipment

My brewday setup

Continue reading »

May 282008
 

Just when I thought I had my system dialed in… When the last brew session had gone well and I’d hit all my numbers… When I could do no wrong…Five gallons down the drain...
Yes, that’s five gallons of Engine 97 being poured down the kitchen sink. I kegged it on Saturday and noticed an interesting aroma – it was a weird fruity scent, not all that unpleasant, but definitely abnormal for this beer.

I tapped the keg for a sample tonight and the beer was just bad. I can’t even properly describe the off flavors – just a sweetish fruity aroma and a nasty taste… too sweet and too bitter all at the same time. It tasted nothing like Engine 97 – I’ve brewed this recipe quite a few times, and it wasn’t even close. I suspect some kind of infection, but where did I pick it up? I noticed the aroma out of the fermentor, so at least it isn’t my kegging gear.

I suspect it was either during cooling (I was rushing because the brew session ran late – perhaps some unsanitary water found its way into the cool wort?) or when I pitched the yeast (I reused yeast slurry from the last batch – it could’ve been contaminated anytime between harvesting and pitching into this batch).

Well, tossing a batch sucks, but it happens to the best of us. Normally, I would agree with those who say never to toss a batch, since age can do wonders for a funky beer. However, this one was definitely beyond salvage. This is only the third batch I’ve tossed in my homebrewing career – usually I can drink my mistakes, but sometimes you have to draw the line and cut your losses.

Oh, well. On the bright side, I was supposed to brew today and had to postpone until this weekend. I was upset at the time, but it was a blessing in disguise – if I’d brewed without knowing this batch was infected, I might’ve made the same mistake again. At least now I can break down and clean the heck out of my equipment, as well as take a closer look at my procedures and sanitation practices. This batch might’ve just been a one-time fluke, but I have to make sure it doesn’t happen again.

May 222008
 

As I’ve progressed as a homebrewer, I’ve spent a lot of time trying new techniques and tweaking my process. Here are the five changes I’ve made which have had the greatest impact on the quality of the beer I brew.

1. Controlling fermentation temperatures
This is the single most important thing I can recommend to new homebrewers, since it is often overlooked in the beginning and will make an enormous difference in every beer you brew. The first beer I made was fermented in an 80°F ambient room with a brewbelt on the fermentor. It was an awesome beer because I made it, but I don’t think I’d much enjoy a bottle of that today. Fermenting hot can cause all kinds of off flavors and nasty fusel alcohols in the finished product. Fermentation temperatures, with few exceptions, are best kept in the low to mid 60s for ales and even cooler for lagers. A cheap mini-fridge (I got mine on craigslist for $100) and a temperature controller turned my beers from OK to delicious.

2. Pitching the correct amount of yeast
This is another technique that can help all of your beers – extract, partial mash, or all grain. Controlling fermentation is paramount to brewing, and pitching the proper amount of healthy yeast is a big part of that. For every beer you brew, you should be going to Jamil Zainasheff’s Pitching Rate Calculator and figuring out the correct amount of starter, dry yeast, or slurry you should be pitching. If you are using liquid yeast, do yourself a favor and learn how to make a yeast starter (I will have a step-by-step tutorial with pictures posted here soon). Your beer will return the love.

3. Switching to full boils
When I started out, I was constrained to doing partial boils of extract recipes. The size of my brewpot, stove, and apartment dictated the maximum amount of wort I could safely boil at one time. This is a great way to get started in the hobby – you can start off on your household stove, you don’t need a huge kettle, and the boil and cooling phases of the brew are quicker and easier. However, I definitely saw a big difference in quality when I was able to move to full boils. Not only did it prepare me for the leap to all grain, but it produced a better beer – it is almost impossible to produce a light-colored beer with a partial boil due to the concentration of the wort, and full boils allow for proper hop utilization. Even if you never switch to all grain, make the switch to full boils if your circumstances allow.

4a. Switching to all grain
Ahh, the Holy Grail of brewing. Many homebrewers will never attempt all grain – for some it is more trouble than it’s worth, while others may not have the space, time, or money to make the switch. That’s fine – you can make excellent beers using extract, and the many varieties of extract available today gives you a lot of flexibility to brew different styles. However, if you want total, complete control of the brewing process from start to finish, all grain is a must. It’s really not that difficult once you get the hang of it, and, personally, I feel more invested in a beer that I created out of actual grain. My all grain beers taste much better than my first extract brews, but I wouldn’t blame the extract. Rather, switching to all grain forced me to really learn about beer and become a better brewer. All grain may not be for everyone, but I highly recommend it!

4b. Switching to mini-mashes
Even if you never make the switch from extract brewing, learn to do a mini-mash so you can take advantage of the many specialty grains available to you. My first all-extract beers were lacking in depth and flavor. As soon as I started making some mini-mash kits out there, I saw what a difference specialty grain made in the taste of my beer. Mini-mashes are easy and you get a lot of bang for your buck – just be warned, it’s a slippery slope down to all grain!

5. Kegging my beer
Kegging didn’t directly improve my beer, but it has been one of the biggest improvements to my brewery. Aside from the benefit of having cold, tasty homebrew on tap at a moment’s notice, kegging eliminates my least-favorite part of brewing: bottling. I’ve cut my bottling day time down to thirty minutes, and eliminating this tedious chore has led to increased brewery output and brewer happiness. Also, corny kegs make great vessels for lagering or conditioning, and being able to transfer beer under CO2 pressure helps reduce oxygenation concerns during racking.

May 212008
 

I’ve been toying with the idea of a mash recirculation setup for my system recently. Using some sort of mash recirculation system gives you much finer control over mash temperatures. In an infusion mash, the kind I do now, the temperature of the grain and the ratio of water to grain are plugged into brewing software (or thermodynamics equations if you’re wiggy like that) to calculate how hot your strike water needs to be to achieve your desired mash temp. For example, 10 lb of grain sitting at 72°F with a 1.25 qt/lb ratio would require 166°F strike water to achieve a mash temp of 154°F, according to BeerSmith.

The problem with this process is that it can be pretty tough to hit your mash temperature exactly. If you brew enough on the same system, you can tweak your process until you nail it pretty consistently, but there will always be hot and cold spots in the mash which makes getting an even temperature across the entire mashtun difficult. I’m usually off by a degree or two – not a huge deal, but it does add some variance to my brew sessions. Even if you do manage to hit your desired temperature exactly, the mash is going to cool over time. My mashes typically last one hour, and I’ll see a temperature drop of anywhere from one to five degrees using a converted Coleman cooler as my mashtun – more if the ambient temperature is really cold.

Now, this isn’t the end of the world, and for many homebrewers it won’t even be a concern. However, if you are looking for exacting control over the mash process, recirculation is the way to go. I see several benefits to using a mash recirculation system:

  • the mash temperature can be raised in step mashes without additional water infusions
  • the mashout temperature can be reached without additional water infusions
  • the strike and mash temperatures can be easily reached and accurately maintained throughout the entire mash
  • an even temperature can be maintained across the entire grain bed

However, there are also some drawbacks. Mash recirculation requires extra equipment, like a pump and a heating element. It also makes your setup that much more complicated – the more moving parts and steps in your process, the more likely something will go wrong at some point. So the question seems to be: Do the pros of mash recirculation outweigh the cons? That very debate has been hashed to pieces in brewing forums across the globe.

Personally, I’ve never had any problems doing plain old infusion mashes. To go buy a pump and rig up a heat exchanger seemed like a solution looking for a problem. However, I now own a March pump (which I find indispensable during the brewing process) and I’m always looking for new ways to use it. Also, as I tackle more difficult and delicate beer styles, such as Kölsch and other light lagers, I can appreciate the benefits of more precision during the mash. So, I’ve decided to revisit the idea of recirculation, while trying to keep it as simple as possible.

I’m not sure if this will work the way I hope, and I can’t even take credit for the idea – it came from a thread on Morebeer’s forums, where the author described a method his homebrew club uses to reach mashout temperatures during their brews. Basically, it’s a poor (or lazy) man’s RIMS setup, using the boil kettle to apply direct heat instead of a heating element. The pump pulls wort from the mashtun and pumps it into the heated kettle, with the idea that the whirlpool action the pump’s output creates will keep the wort moving and avoid any scorching. The wort is then gravity-fed from the kettle’s spigot back to the mashtun (see diagram below). Temperature feedback is provided via thermometers placed in the kettle and mashtun, while careful use of the kettle burner heats the wort to the proper temperature. The output flow of the pump can be restricted to match the output flow of the mashtun, keeping the system in balance and the level of wort in the kettle constant.
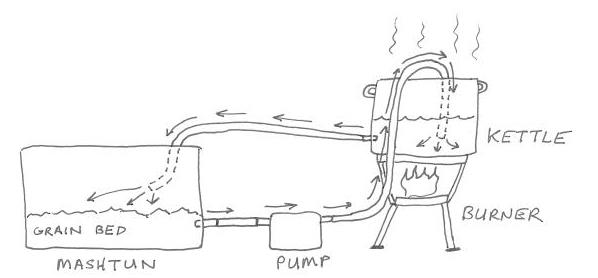
Diagram of cheap mash circulation idea

This lacks a lot of the automation and precision of a true RIMS or HERMS design, but I think it would be more precise than infusions and doesn’t require any additional equipment. I see a few potential problems that may need ironing out:

  • will I need a sparge arm to evenly distribute the recirculated wort over the grain bed, to prevent channeling and inconsistent temps?
  • any possibility of hot-side aeration? (I don’t really believe it’s a problem on the homebrew level, but can’t pass up the opportunity to freak out the HSA fear mongerers)
  • will a stuck sparge/clogged manifold be more of an issue than usual?
  • how difficult will it really be to maintain a steady temp using the direct heat method?

Obviously, this needs some empirical testing to see how well it works, but I am optimistic. I will perform a few experiments next week and report back with my results. Eventually I’d like to go to a real HERMS system, but I’m a ways off from that and this could be a nice compromise.

Note to novice brewers – don’t worry about all of this yet. Having a recirculation system will not replace actual skill and magically produce great beer, just as not having one will not prevent you from making great beer. In fact, I eschew any kind of automation until you have your basic skills down.
May 192008
 

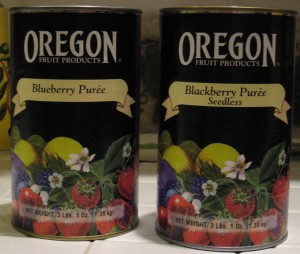
Cans of Oregon fruit pureeHere’s a picture of the cans of Oregon fruit puree I use for my fruit beers. They come in 3 lb 1 oz containers and most homebrew shops sell them for $15-20, depending on the flavor. I’ve seen them in cherry, blackberry, blueberry, peach, and apricot varieties. The blackberry is destined for a future wheat beer, while the blueberry will become the secret ingredient in my Leinenkugle’s Sunset Wheat clone planned for this weekend.

They are sanitized and seedless, so I just sanitize the outside of the can, open them up, and pour them into my clean and sanitized secondary fermentor. I rack my fermented beer right on top of the fruit and let it sit for a few weeks (I’ve found two weeks seems to impart a good flavor to a five gallons of a light-bodied beer, but your mileage and taste may differ) before racking off the fruit for kegging/bottling or further conditioning.

May 162008
 

One of the features I’ll be doing every month is What’s on Tap – a discussion of some of the beers I’ve brewed and am enjoying that particular month. This month is the premier of WoT, and I currently have two kegs I’m working on emptying.

Engine 97 Steam Beer
This is one of my house beers and a favorite among my fans. It is brewed in the style of a California Common (BJCP category 7B, Amber Hybrid Beer/California Common Beer), also called steam beer. The quintessential commercial example of a Cal Common is Anchor Brewing’s Anchor Steam. This style calls for a medium-bodied amber to light copper colored ale, with a moderately malty taste and pronounced hop bitterness. The style showcases the Northern Brewer hop variety, which produces woody, rustic, or minty qualities. In addition, light caramel and fruity notes are acceptable.

My version is brewed using one of Jamil Zainasheff’s recipes, and I like it better than Anchor Steam. It adds a nice amount of malt complexity with its varied grain bill, and has that nice hop punch you want from a Cal Common. The batch I am currently drinking was brewed in early April and is conditioning nicely in my beer fridge – however, I doubt it will have time to reach its true peak, since I have been steadily attacking this keg!

Only “problem” with that brew session was that I was adjusting to a bunch of new equipment and missed my original gravity by quite a bit, causing this batch to be lighter in body than I expected. As a result, the caramel notes aren’t really there, the beer tastes a lot hoppier than usual (sort of like a baby IPA), and the alcohol content is low (somewhere around 4% ABV). Of course, these aren’t really problems – the beer still tastes great and the lower ABV makes it a nice session beer. However, these are things which would get me dinged in a competition for straying out of style.

Client #9
This beer was designed to be a clone of Magic Hat’s #9. Magic Hat describes that beer as “not quite pale ale”. Technically, this would fall under the rather broad style of Fruit Beer (BJCP category 20, Fruit Beer). Basically, all the style holds you to is having the fruit you used come through in the aroma and taste, have the fruit flavor be supportive and not artificial or overpowering, and have a well-brewed base beer backing it all up.

I brewed this one in late March, right when the Eliot Spitzer scandal was breaking, so I named it in his honor. This beer was another victim of my new equipment breaking-in period, so the original gravity also came in on the low side. It’s a little lighter-bodied and has a touch less alcohol than planned, but the apricot flavor fills it out nicely. It was racked onto a can’s worth of Oregon apricot puree (Oregon makes seedless, sanitized fruit purees without added sugars or fermentables which are available at homebrew shops and online – they work great. The purees you find in the supermarket should be avoided!) for two weeks and then kegged. The beer turned out very nice – a medium-hopped, unassuming pale ale in the background, complemented by a nice, fresh apricot nose and taste. I have it carbonated on the higher side and it is a nice, refreshing springtime beverage.

This keg is just about done. My girlfriend loves this stuff, preferring it to Magic Hat’s brew. The keg would be kicked already, but we are having company for Memorial Day weekend and they want to try some. I have already been contracted for another batch, but I might try a different flavor, like blackberry.